
Table of Contents
- 1. Overview
- 2. Installation
- 3. Configuration
- 4. Testing
- 5. What is new in version 4.6.0
- 6. Support
- 7. FAQ (Frequently Asked Questions)
- How can I use this extension for Product Engraving?
- How can I control the stock of Personalization options?
- How do I add a new Gift Wrapping or Personalization option?
- Can I use the extension for services other than Gift Wrapping?
- Where do customers select the Gift Wrapping or Personalization option?
- Can customers add a personalized message?
- Can I change the Gift Wrapper heading and button text?
- How can I disable the Gift Wrapper & Product Personalization section?
- Where can I see the personalization details after an order is placed?
- Why are my personalization products not appearing in the shopping cart?
- Can I change the price of a Gift Wrapping or Personalization service?
- Can I add or remove personalization options after configuring the extension?
1. Overview
Gift Wrapper & Product Personalization Extension for Magento 2 offers customers to choose gift wrap option to products and add personalized gift message. This user guide describes the easy steps how to install and configure the extension.
2. Installation
Method 1 Install using Composer
Composer method is recommended if you have purchased the extension via Market place
composer require globalecom/module-giftwrapper
php bin/magento setup:upgrade
php bin/magento setup:di:compile
php bin/magento cache:clean
Method 2 Manual installation
Upload the extension zip file and extract the files under app/code folder.
Run Installation commands via CLI
How to open CLI: Login to your server with SSH (using putty or similar tool). Go to your Magento root folder (Usually public_html folder) and run commands below. This is the standard Magento extension installation procedure.
Enable Gift wrap module
php bin/magento module:enable Globalecom_Giftwrapper
Run upgrade command: (This is a standard Magento command)
php bin/magento setup:upgrade
Run Compile command (Optional)
php -d memory_limit=-1 bin/magento setup:di:compile
Redeploy static content (Optional)
php -d memory_limit=-1 bin/magento setup:static-content:deploy
Verify if the module is listed:
List modules
php -d memory_limit=-1 bin/magento module:status
3. Configuration
Easy to configure in Three Steps: 1) Add Gift wrap. 2) Add settings. 3) Clear cache and Test
Step 1: Setup Gift wrap products and category in admin panel
Add Products and Assign to Gift Box Category. These products are like Gift wrap options. Example: Green Gift Wrap. These options are displayed in Shopping cart page.
1 a) Admin Panel > Catalog > Products > Add Product
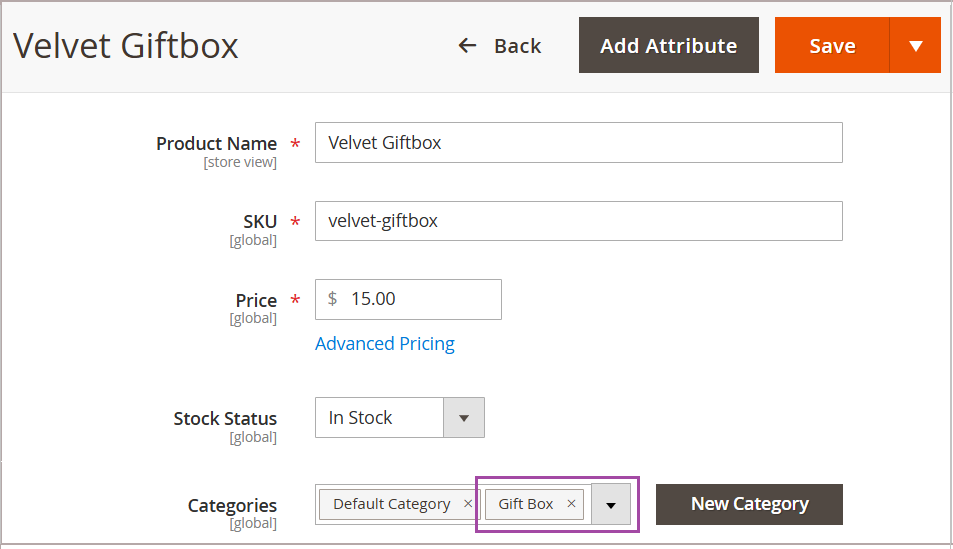
Repeat the steps to add as many products as per your requirements.
Note: Choose attribute set as “default” while adding a new product.
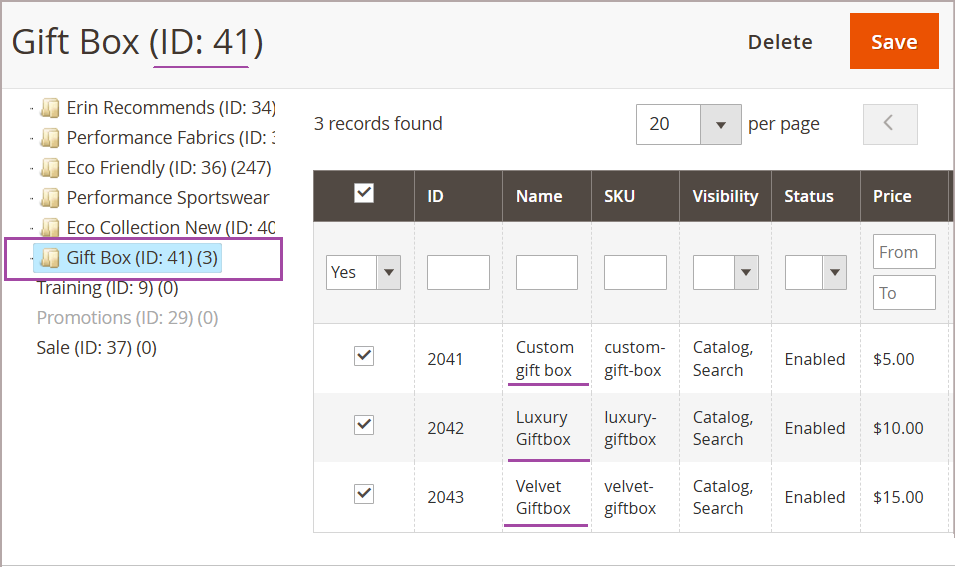
1 b) Admin Panel > Catalog > Categories > Add Gift box Category.
Category name can be anything, it is as per your choice. Assign the products (created in Step 1 above) Note down Category ID. For Example Category Id=41 as shown below. This ID may be different for you.
Step 2: Adjust Configuration settings
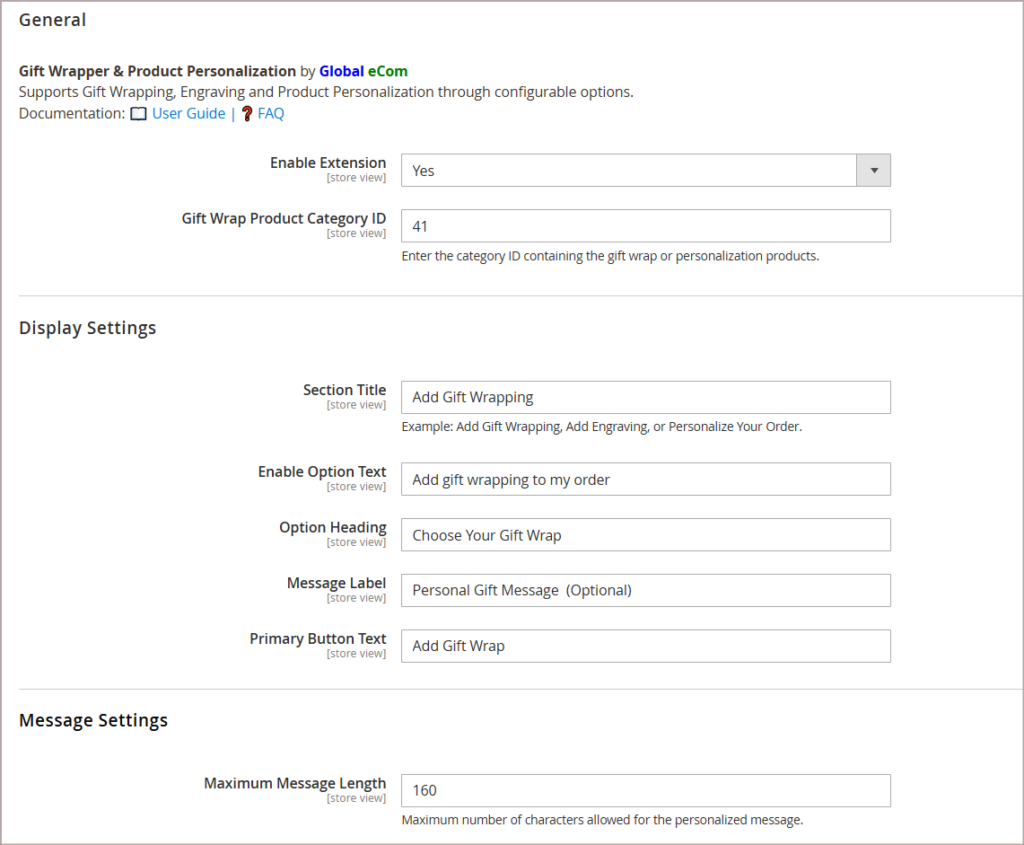
Admin Panel > Store > Configuration > Global eCom > Giftwrapper
2 a) Enter the Gift wrap Category ID, that you noted down in Step 1b.
2 b) Adjust other settings as per your requirements. (Optional)
You may retain the default configuration settings OR change as per your business requirements based on these options.
This extension supports Gift Wrapping, Engraving and Product Personalization through configurable options
For example, the Engrave options, you may adjust the Tile, Heading and Label from ‘Gift wrap‘ to ‘Product Engraving‘
🎁 Gift Wrapping
✍️ Product Engraving
🎀 Premium Gift Box
💌 Greeting Cards
🎉 Special Packaging
📝 Personalized Message
Configuration Settings
Step 3: Refresh Magento Cache
Refresh Magento cache and Test. Admin > System > Cache Management

4. Testing
Before testing, you may want to run through the check list to make sure extension installed and configured correctly.
✅ Extension is installed and is showing in the module list
✅ Added Gift box category, created Gift wrap product options and assigned to Gift box category
✅ Set the Gift wrap category ID in Configuration
✅ Adjusted Default Display options and Message length as needed
1. Gift wrap function in front end
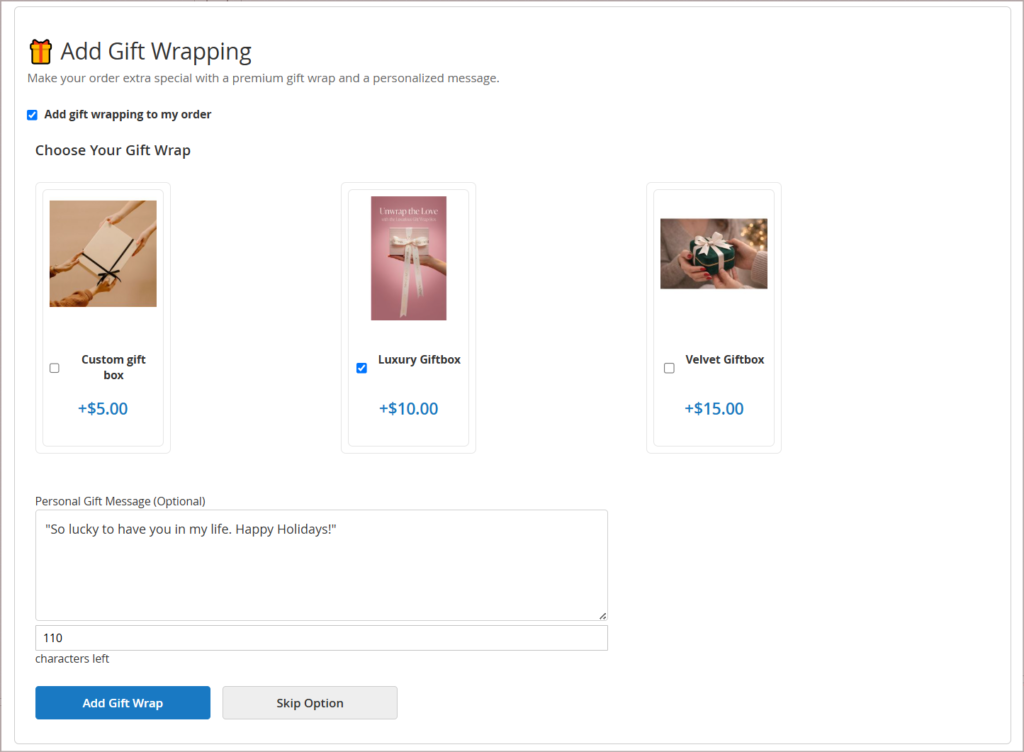
Open your Website > Select a product -> Add to Cart -> View Shopping Cart page
Then Choose Gift wrap option and add personalized message (Optional)
Add Giftwrap, then proceed to checkout and place order.
2. Verify Gift wrap data in Admin back end
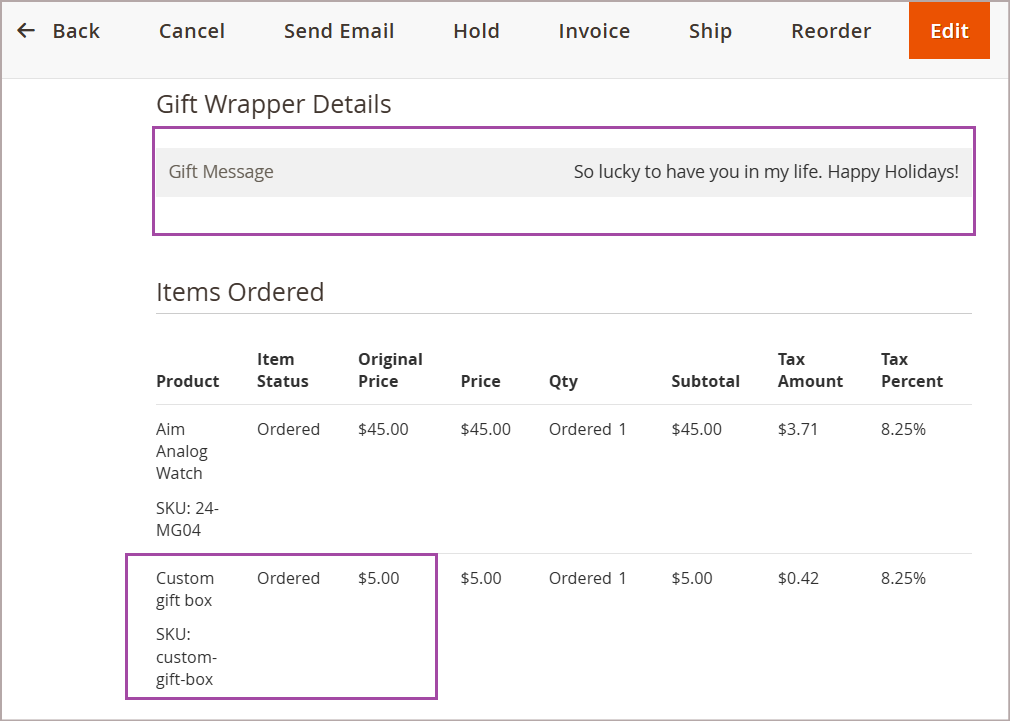
Verify gift wrap item and gift message in Admin > Sales > Orders
5. What is new in version 4.6.0
Version 4.6 Highlights
✅ Improved frontend implementation
✅ Improved Admin Order View
✅ Better configuration options
✅ Quote-based Gift Message storage
✅ PHP 8.x compatibility
✅ Refactored architecture
✅ Marketplace quality improvements
6. Support
If you require further assistance, create a support ticket or contact our support team.
We’re committed to delivering timely support and continuous product enhancements.
7. FAQ (Frequently Asked Questions)
How can I use this extension for Product Engraving?
The extension can be configured to support Product Engraving. Admin can create Engraving options as standard Magento products and assign them to the configured personalization product category. Then adjust the extension settings as required, such as the section title, button text, and gift message character limit.
How can I control the stock of Personalization options?
The extension uses Magento’s native product management for personalization services. Each personalization option is managed as a separate Magento product, allowing you to control its price, inventory, availability, image, and description using the standard Magento product management.
How do I add a new Gift Wrapping or Personalization option?
Create a new product from Admin → Catalog → Products → Add Product, configure the product price and other required details, and assign it to the category selected in the extension’s Personalization Product Category configuration. The product will then be available as a personalization option in the shopping cart.
Can I use the extension for services other than Gift Wrapping?
Yes. The extension is designed to support different types of value-added services using standard Magento products. Examples include Product Engraving, Premium Gift Box, Greeting Cards, Special Packaging, and other personalization services. You can configure the section title and button text to match the service being offered.
Where do customers select the Gift Wrapping or Personalization option?
Personalization services are presented in the shopping cart after customers add products to their cart. Customers can review the available services and their prices and update their selection without leaving the shopping cart.
Can customers add a personalized message?
Yes. Customers can enter a personalized gift message from the shopping cart. The administrator can configure the maximum number of characters allowed, and a live character counter is displayed while the customer is typing.
Yes. The extension provides configuration options for the Section Title and Button Text displayed in the shopping cart. This allows you to adapt the wording to your service—for example, changing the title to “Product Engraving” and the button to “Add Engraving.”
How can I disable the Gift Wrapper & Product Personalization section?
Go to the extension configuration in Magento Admin and set Enable Extension to No. When the extension is disabled, the personalization section is hidden from the shopping cart.
Where can I see the personalization details after an order is placed?
The selected personalization service, customer gift message, personalization product pricing, and order summary are stored with the order. Store administrators can review these details from the Magento Admin Order View when processing the order.
Why are my personalization products not appearing in the shopping cart?
Check the following:
- The extension is enabled.
- A valid personalization product category is selected in the configuration.
- The personalization products are assigned to that category.
- Magento cache has been refreshed.
- Static content has been deployed after installation.
- Magento indexes have been rebuilt if required.
Can I change the price of a Gift Wrapping or Personalization service?
Yes. Personalization options are standard Magento products, so their prices can be managed through the normal Magento product management. The selected service price is reflected in the shopping cart and stored with the order.
Can I add or remove personalization options after configuring the extension?
Yes. You can create additional personalization products, update existing products, enable or disable services, manage inventory, change images and descriptions, and organize services through Magento’s standard catalog management.